Sunday, January 19, 2025

DIY guide to backyard shed construction basics

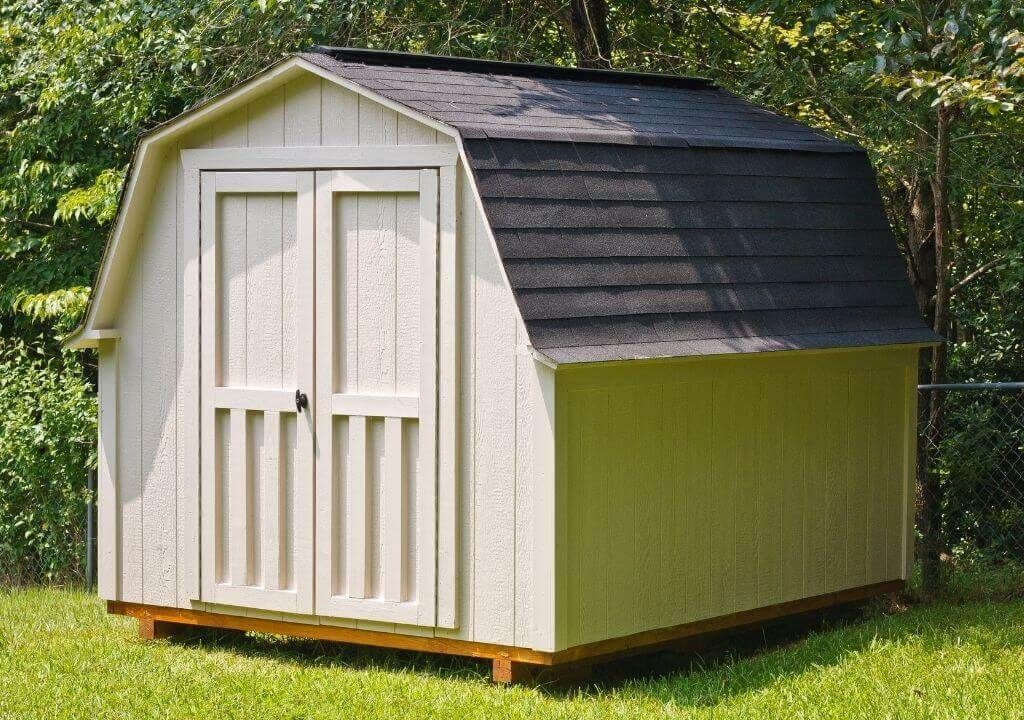
Building Your Dream Backyard Shed: A DIY Guide

Hey there, fellow DIY enthusiasts! So, you're dreaming of a backyard shed â€" a glorious space for storing your gardening tools, bikes, or maybe even a secret crafting haven? Fantastic! Building your own shed might seem daunting, but trust me, it's totally achievable with a little planning and elbow grease. This guide will walk you through the basics, turning your shed dreams into a reality.

Planning Your Shed Project: Dream Big, But Start Small (ish)

Before you even think about grabbing a hammer, let's get the planning sorted. This is the crucial part, believe me! A little planning up front saves a whole lot of headaches later on.

Size and Location: The Golden Rules

First things first: how big do you need your shed to be? Consider what you'll be storing and how much space you realistically need. Remember to measure your yard carefully â€" you don't want your magnificent shed to be awkwardly crammed into a corner! Check your local building codes too; some areas have restrictions on shed size and placement. You might even need a permit, so do your homework!

Materials: Wood, Metal, or Plastic?

The shed material is a big decision. Wood offers a classic, customizable look but requires more maintenance. Metal sheds are durable and low-maintenance but can get hot in the summer and cold in the winter. Plastic sheds are the most budget-friendly and low-maintenance but are generally less sturdy and stylish. Weigh the pros and cons based on your needs and budget.

Tools of the Trade: Gather Your Arsenal

You'll need a range of tools for this project. Don't worry, you don't need a full-fledged workshop! Here's a basic list:

  • Measuring tape
  • Level
  • Shovel
  • Post-hole digger (or a strong friend!)
  • Hammer
  • Screwdriver (both Phillips and flathead)
  • Circular saw (or hand saw for the truly ambitious)
  • Drill
  • Safety glasses
  • Work gloves

You might need additional tools depending on the shed design and materials you choose. It's always better to have more than you need than to be caught short!

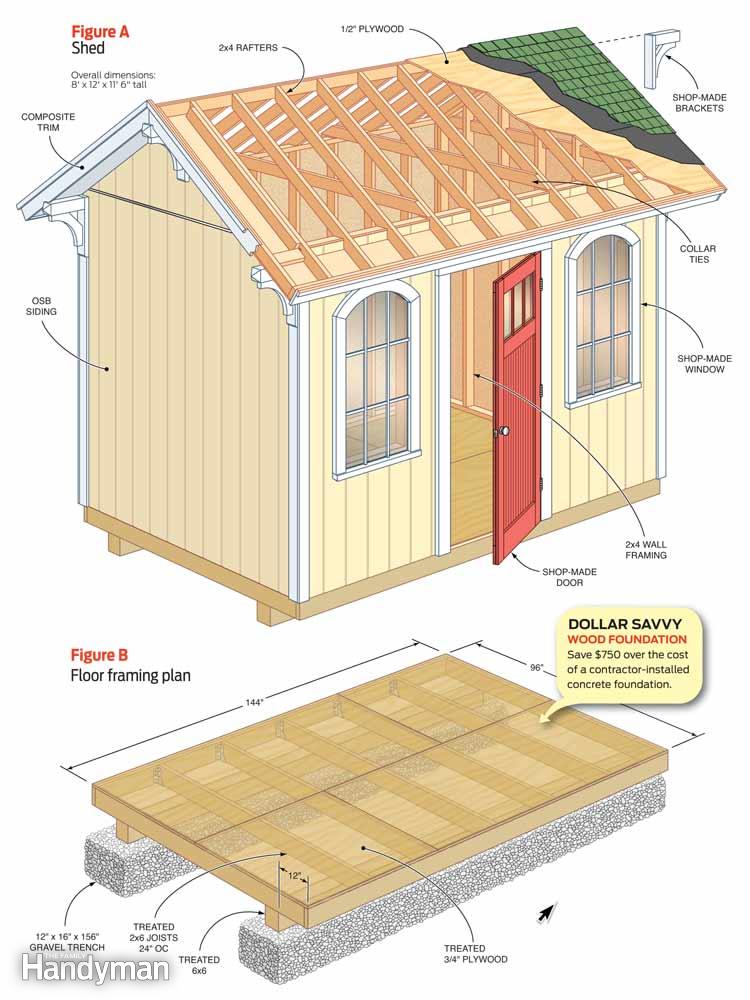
Building the Foundation: A Solid Start

A sturdy foundation is vital for a long-lasting shed. There are a few options here, each with its own pros and cons:

Concrete Slab: The Heavyweight Champion

This is the most robust option but also the most expensive and labor-intensive. It involves pouring a concrete slab, which requires some serious mixing and leveling skills. It’s best for larger or heavier sheds.

Gravel Base: A Budget-Friendly Friend

A gravel base is a simpler and more affordable option. You'll need to dig out a level area, lay down weed barrier fabric, and then add several inches of compacted gravel. This is suitable for smaller, lighter sheds.

Wooden Skids or Pressure-Treated Blocks: The Easy Route

This method is relatively quick and easy, making it ideal for smaller sheds. You simply place pressure-treated blocks or skids on the ground, ensuring they're level. This option isn't as durable as a concrete slab or gravel base, though.

Framing and Walls: The Shed's Skeleton

Once your foundation is set, it's time to build the frame. This usually involves creating a rectangular base using pressure-treated lumber, then erecting the walls. Follow your chosen shed plans meticulously, paying close attention to squareness and levelness. Remember, accuracy here is key to a stable and aesthetically pleasing shed.

Roofing: Rain or Shine

The roof is the final piece of the puzzle. Common roofing materials for sheds include asphalt shingles, metal roofing, and even corrugated plastic sheets. Choose a material that suits your budget and aesthetic preferences. Make sure you have sufficient overhang to protect the walls from rain and snow. Proper sealing is essential to prevent leaks.

Finishing Touches: Doors, Windows, and Personalization

Once the structure is complete, you can add the finishing touches. This includes installing doors and windows, adding trim, and painting or staining the shed. Get creative here! This is your chance to personalize your shed and make it your own. Consider adding shelves, hooks, or other organizational features to maximize space and functionality.

Commonly Asked Questions

Q: How long does it take to build a backyard shed?

A: This depends on the size and complexity of your shed, as well as your experience level. A simple small shed might take a weekend, while a larger, more complex shed could take several weeks or even months.

Q: Do I need a building permit?

A: This varies by location. Check with your local authorities before you start building. Ignoring building codes can lead to serious fines.

Q: Can I build a shed myself, or should I hire a professional?

A: If you're handy with tools and have some DIY experience, building a shed yourself is totally doable. However, if you're not comfortable with construction, hiring a professional is always an option.

Q: How much does it cost to build a backyard shed?

A: The cost varies wildly depending on the size, materials, and features you choose. A simple small shed might cost a few hundred dollars, while a larger, more elaborate shed could cost thousands.

Q: What about insulation?

A: Insulation is optional but highly recommended if you plan to use your shed year-round or for temperature-sensitive items. Consider adding insulation to the walls and roof.

And there you have it! Building your own backyard shed can be a rewarding and satisfying experience. Remember to take your time, plan carefully, and most importantly, have fun! Happy building!

Practical storage solutions with loft sheds

Unlocking Space: Practical Storage Solutions with Loft Sheds

Tired of overflowing garages and cluttered basements? A loft shed offers a surprisingly versatile solution to your storage woes. These elevated structures maximize space, offering both practicality and aesthetic appeal. From neatly organizing seasonal items to housing valuable possessions, a well-planned loft shed transforms unused outdoor areas into efficient storage havens. This article explores creative storage ideas to fully utilize the potential of your loft shed, maximizing space and simplifying your life.

Maximizing Vertical Space: Shelving and Racking Systems

The key to effective loft shed storage lies in utilizing the vertical dimension. Forget haphazard piles; instead, invest in robust shelving and racking systems. Consider the weight capacity of your chosen materials â€" you might need heavy-duty shelving for storing heavier items like gardening tools or sporting equipment. Modular shelving units are particularly versatile; they adapt to your evolving storage needs, allowing you to easily adjust the height and configuration of your shelves. Remember to leave sufficient space between shelves to easily access items, avoiding frustrating rummaging. Utilize the full height of the shed; even the space beneath the rafters can be used with carefully planned shelving.

Choosing the Right Shelving Material

Select shelving materials based on your specific needs and budget. Metal shelving offers durability and stability, perfect for heavier items. Wooden shelving provides a more aesthetically pleasing option, but might require more regular maintenance. Plastic shelving is lightweight and easy to clean, making it ideal for storing less weighty items.

Creative Storage Solutions for Specific Items

Organizing items effectively depends on understanding what you're storing. Think beyond basic shelving and employ creative solutions for specific categories. For instance, long-handled tools like shovels and rakes find a perfect home hanging vertically on a pegboard or specialized tool rack. Seasonal clothing can be stored neatly in labeled plastic bins stacked on shelves. Consider using clear plastic bins for easy identification of contents. For smaller, easily misplaced items, utilize drawer units or compartmentalized storage boxes. Remember that labeling everything is key to maintaining an organized and efficient storage space.

Optimizing Space with Vertical Hanging Organizers

Don't underestimate the power of vertical hanging organizers! These can be hung from the ceiling or walls, providing extra space for items like garden gloves, small hand tools, or even lightweight sports equipment. Consider using fabric organizers for a softer, more aesthetically pleasing look, or opt for sturdy plastic or metal versions for added durability.

Maintaining Order and Accessibility: Tips for Long-Term Success

Implementing a well-thought-out storage system is only half the battle. Maintaining order and ensuring easy accessibility is crucial for long-term success. Regularly declutter your loft shed; donate or discard items you no longer need. Utilize clear labels on all containers and shelves to instantly identify stored items. Consider a color-coding system for further organization. By implementing these simple strategies, you’ll ensure your loft shed remains a space-saving marvel, not a source of frustration.

Essential Maintenance Tips

Regularly inspect your shelves and racking systems for any signs of damage or wear and tear. Address any issues promptly to prevent accidents. Keep the shed clean and dry to prevent the buildup of dust and moisture, which can damage stored items.

With careful planning and these practical suggestions, your loft shed can become the ultimate storage solution, freeing up valuable space in your home and streamlining your organization.

Friday, November 22, 2024

Step-by-Step Wood Pallet Shed Plans for a Quick and Easy Build

Step-by-Step Wood Pallet Shed Plans for a Quick and Easy Build

Build Your Own Pallet Shed: A Quick & Easy Guide

Tired of overflowing garages and cluttered yards? Dreaming of a simple, inexpensive storage solution? Then look no further! This guide provides step-by-step instructions for building a charming and functional shed using reclaimed wood pallets. This project requires minimal tools and expertise, making it perfect for weekend warriors or DIY enthusiasts on a budget. Get ready to transform your outdoor space with a personalized pallet shed you'll be proud of!

Gathering Your Materials: What You'll Need

Before you begin hammering, ensure you have all the necessary materials. This project relies heavily on reclaimed wood pallets, so start your search! Look for pallets in good condition â€" sturdy, free of rot or significant damage. Aim for pallets of consistent size for easier construction. Beyond the pallets, you'll need:

  • At least 6-8 sturdy wood pallets: The exact number will depend on the desired size of your shed.
  • Heavy-duty screws: Choose exterior-grade screws to withstand the elements.
  • Drill with various drill bits: You'll need bits for both pilot holes and driving the screws.
  • Hammer: For occasional nail removal or adjustments.
  • Measuring tape and pencil: Essential for accurate measurements and marking.
  • Level: Ensuring the shed's foundation is level is crucial for stability.
  • Safety glasses and work gloves: Protect your eyes and hands throughout the process.
  • Optional: Exterior-grade paint or stain to protect the wood and add a personal touch; roofing material (tar paper and shingles or a similar option); hinges and a latch for the door.

Building the Foundation: A Stable Start

A level foundation is critical for your shed's longevity and structural integrity. Begin by clearing a level area in your yard. Consider using a gravel base for better drainage and stability. Lay down some landscape fabric to prevent weeds from growing up through the base. Once you have a level and prepared base, you can start assembling the floor of your pallet shed. Lay the pallets out in a grid pattern, ensuring they are flush with each other. Securely fasten the pallets together using screws, ensuring your foundation is solid and level.

Securing the Floor: Solid and Stable

Use at least two screws per pallet connection, strategically placing them to maximize strength. Check for levelness as you go, making adjustments as needed. A sturdy floor is the bedrock of your entire shed structure, so take your time with this step.

Constructing the Walls and Roof: Adding Height and Protection

Once the floor is complete, begin constructing the walls. Carefully stack the remaining pallets vertically, securing them to the floor and to each other with heavy-duty screws. You'll want to decide on the height of your shed before you start. Remember to leave space for a door. For the roof, you have a couple of options. You can either create a simple gabled roof using additional pallets, or, for a simpler option, construct a flat roof using plywood sheets covered with appropriate roofing material. This will provide basic weather protection.

Creating the Door: Access with Ease

Consider how you want to design the door. You might use a single pallet for a small door or combine several for a larger opening. Remember to account for the hinges and latch when making your cuts and planning the construction. Make sure the door is securely attached and easy to open and close.

Finishing Touches and Maintenance: Long-Term Care

Congratulations! Your pallet shed is nearly complete. Now is the time for those finishing touches. Consider adding a layer of exterior-grade paint or stain to protect the wood from the elements and enhance its appearance. This will extend the life of your shed and give it a personalized touch. Regular maintenance, such as cleaning and checking for loose screws, will help keep your pallet shed in top condition for years to come. Don’t forget to add your personal touches - a shelf, hooks for tools, or some plants to personalize the space.

Building a pallet shed is a rewarding and economical project that allows you to create a functional and aesthetically pleasing storage solution. Enjoy your newly constructed shed and the extra space it provides!

Thursday, November 21, 2024

Free Pallet Shed Plans: How to Build a Custom Storage Shed for Your Yard

Free Pallet Shed Plans: How to Build a Custom Storage Shed for Your Yard

Free Pallet Shed Plans: How to Build a Custom Storage Shed for Your Yard

The allure of a well-organized yard, free from clutter and overflowing storage bins, is undeniable. A custom-built shed offers the perfect solution, providing ample space for tools, garden supplies, and seasonal items. However, the cost of professionally constructed sheds can be prohibitive. This comprehensive guide outlines how to construct a durable and aesthetically pleasing shed using reclaimed pallets, minimizing material costs while maximizing practicality and personal design.

Assessing Your Needs and Site Preparation

Before embarking on construction, a meticulous planning phase is crucial. This involves careful consideration of several key factors:

Determining Shed Dimensions and Functionality

The dimensions of your pallet shed should align with your storage needs and the available yard space. Consider the types of items you intend to store. Larger items, such as lawnmowers or bicycles, require more internal space. Sketch a basic floor plan, noting the placement of shelves, tool racks, and other internal features. Accurate measurements will be paramount for ensuring sufficient pallet quantity and minimizing waste.

Choosing the Optimal Location

The chosen location must be level, well-drained, and easily accessible. Consider proximity to power sources if you plan on incorporating electric lighting or tools. Avoid areas prone to flooding or excessive shade. Assess local building codes and regulations regarding shed placement, ensuring compliance with setbacks and height restrictions. Proper site preparation, involving leveling the ground and potentially laying a gravel base, is critical for a stable structure.

Gathering Necessary Materials and Tools

Beyond reclaimed pallets, several materials are essential for constructing a robust and weather-resistant shed. This list includes, but is not limited to:

  • Pressure-treated lumber: For the foundation, framing, and roof supports.
  • Roofing materials: Asphalt shingles, corrugated metal, or other weatherproof options.
  • Fasteners: Galvanized nails, screws, and bolts to ensure longevity and weather resistance.
  • Concrete blocks or pier blocks: To create a stable foundation.
  • Weather sealant: To protect wood from moisture damage.
  • Optional additions: Windows for ventilation and natural light, a door, hinges, and a lock.

Regarding tools, a basic carpentry set is required, encompassing a measuring tape, level, saw (circular saw or hand saw), hammer, drill, screwdriver, and safety glasses.

Constructing the Pallet Shed Frame

The foundation of the shed is paramount for its stability. A robust frame, built with pressure-treated lumber, provides the essential skeletal structure to support the pallets and roof.

Building the Foundation

Begin by establishing a level foundation using concrete blocks or pier blocks. Ensure they are evenly spaced and appropriately sized to support the weight of the shed. The dimensions of your foundation should correspond precisely with your pre-determined shed dimensions. Leveling is crucial; employ a level to guarantee a perfectly flat base.

Framing the Walls and Floor

Construct a rectangular frame using pressure-treated lumber for the floor and walls. The dimensions should be consistent with your planned shed dimensions. Ensure the frame is square and plumb, using a level and measuring tape to verify accuracy at each stage of construction. Securely fasten the lumber using galvanized screws or nails.

Incorporating Reclaimed Pallets

Once the frame is completed, begin attaching the reclaimed pallets to the exterior walls. Thoroughly inspect each pallet for damage or rot before installation. Use galvanized screws to secure the pallets to the frame, ensuring they are flush and level. You may need to cut and modify some pallets to fit perfectly. Consider the aesthetic appeal when positioning the pallets â€" variations in wood grain can enhance the overall visual impact.

Roof Construction and Finishing Touches

The roof provides crucial weather protection. Proper construction ensures longevity and safeguards stored items from the elements.

Building the Roof Frame

Construct a sturdy roof frame using pressure-treated lumber, creating rafters that extend from the wall framing to a central ridge beam. The pitch of the roof should provide adequate water runoff. Ensure all connections are secure and reinforced for strength and stability. Proper bracing is essential to prevent sagging or structural compromise.

Installing Roofing Materials

Select a suitable roofing material, such as asphalt shingles, corrugated metal, or recycled plastic sheets. Follow the manufacturer's instructions for installation, ensuring proper overlap and weather sealing. Pay particular attention to the edges and around any vents or openings to prevent leaks. A well-sealed roof is essential for preventing water damage to the shed’s contents.

Adding Doors and Windows

Install a sturdy door, utilizing appropriate hinges and a secure lock. Consider adding windows for improved ventilation and natural light. Choose windows that are weather-resistant and provide adequate security. Seal all openings to prevent drafts and moisture infiltration.

Final Refinements and Finishing

Apply a weather sealant to all exposed wood surfaces, protecting the pallets and frame from moisture damage. This step is crucial for extending the lifespan of your shed. Consider adding a coat of paint or stain for enhanced aesthetics and protection. Clean up the surrounding area, removing any debris from the construction process. Your custom pallet shed is now complete, offering years of reliable storage.

Safety Precautions and Considerations

Throughout the construction process, prioritize safety. Always wear appropriate safety gear, including safety glasses, gloves, and sturdy footwear. Use caution when handling power tools and follow manufacturer instructions meticulously. Ensure the structural integrity of the shed at each stage of construction, avoiding shortcuts that could compromise stability or safety.

This detailed guide provides a foundation for building a custom pallet shed. Remember to adapt these plans to your specific needs and preferences. While free plans can be a great starting point, always prioritize safety and structural integrity. Enjoy the satisfaction of creating a functional and aesthetically pleasing addition to your yard.

Free Pallet Shed Plans: How to Build a Shed from Recycled Wood

Free Pallet Shed Plans: How to Build a Shed from Recycled Wood

Free Pallet Shed Plans: How to Build a Shed from Recycled Wood

Hey there, fellow DIY enthusiasts! Ever dreamt of building your own shed but balked at the cost of lumber? Well, get ready to ditch those expensive lumber yards and embrace the beauty of repurposing! This guide will walk you through building a fantastic, functional shed using free, readily available pallets. Let's dive into how you can turn discarded wood into a practical and stylish addition to your property.

Sourcing Your Pallets: The Treasure Hunt Begins!

Before we get into the nitty-gritty of construction, let's talk about the star of the show: the pallets! Finding free pallets might seem like a daunting task, but trust me, it's easier than you think. Here are a few places to start your search:

  • Local Businesses: Grocery stores, hardware stores, and even construction sites often have pallets they're happy to get rid of. A quick call or a friendly visit can often yield a bounty of free wood.
  • Craigslist and Facebook Marketplace: These online platforms are goldmines for free or cheap building materials. Just search for "free pallets" or "pallet wood" in your area.
  • Industrial Parks: Take a stroll around industrial areas (always being mindful of safety and respecting private property) â€" you might be surprised at the number of discarded pallets you find.

Important Note: When collecting pallets, always check for any markings indicating treatment. HT (heat treated) pallets are safe for use in projects like this. Avoid pallets marked with MB (methyl bromide), as this is a harmful pesticide.

Planning Your Pallet Shed: Size Matters (and so does Design!)

Now that you've got your pallets, it's time to plan your shed. Think about what you'll use the shed for. Will it be for storing gardening tools, bicycles, or something else entirely? This will help determine the size and features you'll need.

Determining Dimensions:

Start by sketching out a basic design. Consider the number of pallets you have available, as this will dictate your shed’s size and shape. A simple rectangular shed is a great starting point for beginners. Remember to factor in the thickness of the pallets when calculating your overall dimensions.

Choosing a Foundation:

Your foundation will be crucial for stability. You have several options:

  • Concrete Slab: The most durable option but requires more work and expense.
  • Gravel Base: A simpler and more affordable choice. Simply level the ground and create a base of compacted gravel.
  • Wooden Skids: A quick and easy way to raise the shed slightly off the ground for better ventilation.

Designing the Roof:

A simple gable roof (A-frame) is easy to construct with pallets. You can also get creative with a shed roof (sloping in one direction) for a more modern look.

Construction Time: Let's Build That Shed!

With your plans in place, it's time to get building! This is where your creativity really comes into play. Remember that you're working with reclaimed materials, so flexibility is key. Don't be afraid to adapt the plans as needed.

Preparing the Pallets:

Before you start assembling the shed, give your pallets a good cleaning. Remove any loose nails, staples, or debris. Sand down any rough edges to prevent splinters. You might also want to treat the wood with a weatherproofing sealant to extend the life of your shed.

Building the Frame:

Start by building the base frame using sturdy pallets laid flat. You can fasten them together using screws, bolts, or even strong wood glue reinforced with screws. Remember to ensure your frame is square and level. Next, build the walls, using pallets vertically and securing them to the frame. Again, use plenty of fasteners to ensure stability.

Adding the Roof:

Once the walls are up, it's time for the roof. Construct the roof trusses using pallets, carefully measuring and cutting as needed to achieve the desired angle. Attach the trusses securely to the top of the walls and then cover them with additional pallets or plywood for a weatherproof finish.

Finishing Touches:

Add a door and any necessary windows. You might be able to repurpose old doors or windows, or you can purchase inexpensive ones from a home improvement store. Consider adding a simple latch or padlock for security.

Adding Personality: Beyond the Basics

Now comes the fun part! Once the basic structure is complete, you can really personalize your pallet shed. Consider adding:

  • Exterior paint or stain: Protect the wood and add a splash of color.
  • Shelving: Maximize storage space by adding shelves inside the shed.
  • Lighting: Add a light fixture for better visibility in the evening.
  • Window boxes: Give your shed a charming touch with hanging window boxes filled with flowers.

Commonly Asked Questions

Q: How long does it take to build a pallet shed?

A: The time it takes to build a pallet shed varies greatly depending on the size and complexity of the design, as well as your experience level. A simple shed can be built in a weekend, while a more complex design could take several weekends.

Q: What tools do I need?

A: You’ll need basic carpentry tools such as a hammer, saw, measuring tape, drill, screwdriver, level, and safety glasses. Depending on your foundation choice, you might also need tools for concrete work or gravel placement.

Q: How durable is a pallet shed?

A: The durability of a pallet shed depends on the quality of the pallets you use, the construction techniques, and the type of weatherproofing you apply. With proper construction and care, a pallet shed can last for many years.

Q: Can I use any type of pallet?

A: No, only use heat-treated pallets (HT) for your project. Avoid pallets marked with MB (methyl bromide) due to the harmful chemicals.

Q: Do I need building permits?

A: Building permit requirements vary by location. It's best to check with your local building department before you start your project.

There you have it! Building a pallet shed is a rewarding experience that combines practicality, creativity, and sustainability. Get out there, find those pallets, and unleash your inner builder!

10x12 Pallet Shed Ideas: Build an Eco-Friendly Space in Your Yard

10x12 Pallet Shed Ideas: Build an Eco-Friendly Space in Your Yard

10x12 Pallet Shed Ideas: Build an Eco-Friendly Space in Your Yard

Hey there, fellow DIY enthusiasts! So, you're thinking about building a shed, huh? That's awesome! And you're aiming for eco-friendly? Even better! Using reclaimed pallets for a 10x12 shed is a fantastic way to go green and save some serious cash. Let's dive into some fun ideas to get your creative juices flowing. This isn't just about throwing some pallets together; we're talking about designing a stylish and functional space that reflects your personal style.

Why Choose a Pallet Shed?

Before we jump into the designs, let's talk about why pallets are such a great choice for a shed project. First off, they're cheap (or even free if you can source them responsibly!). Second, they're sustainable â€" you're giving old wood a new purpose, reducing landfill waste. Third, they offer a rustic, charming aesthetic that's super trendy right now. It's a win-win-win!

However, it’s crucial to remember that not all pallets are created equal. Some are treated with chemicals (like pesticides or fungicides), making them unsuitable for indoor or direct-contact uses. Always source your pallets from reputable suppliers and ensure they're heat-treated (HT) or marked with an IPPC stamp. These markings indicate they are safe for repurposing.

10x12 Pallet Shed Design Ideas

Now for the exciting part â€" the design inspiration! A 10x12 shed offers plenty of space for storage, a workshop, or even a tiny office. Here are a few ideas to get those creative gears turning:

The Classic Rustic Shed

This is your quintessential pallet shed. Think exposed wood, a simple gable roof, and maybe a charming little door and window. You could add some reclaimed metal roofing for a truly rugged look. Keep the interior simple with shelving made from more pallets or repurposed wood. It's perfect for storing gardening tools, bikes, or other outdoor equipment.

The Modern Pallet Shed

Believe it or not, pallets can be used to create a surprisingly modern aesthetic. Consider painting the pallets a sleek grey or white, perhaps using a weather-resistant paint to enhance longevity. Incorporate clean lines, minimalist windows, and a contemporary-style door. This design creates a clean and sophisticated feel, ideal for a small home office or art studio.

The Greenhouse/She Shed Combo

Combine your love of plants with your need for extra storage! Part of your 10x12 shed could be dedicated to a small greenhouse, allowing you to propagate plants or simply enjoy a green space. The remaining area can be used for storage or a relaxing seating area. The natural light flooding in will create a beautiful, tranquil setting.

The Workshop Haven

For the DIY enthusiast, a 10x12 pallet shed can be the ultimate workshop. Design it with ample workbench space, plenty of shelving for tools, and good lighting. Consider adding a small window for ventilation and natural light. You can even incorporate a pegboard for even more organization.

The Tiny Office Oasis

Need a quiet workspace away from the hustle and bustle of home? A 10x12 pallet shed can be transformed into a charming and functional home office. Focus on creating a comfortable and well-lit space. Add insulation for year-round comfort and consider installing electricity to power your computer and other office equipment.

Adding Extra Touches:

No matter your chosen design, here are some ideas to personalize your pallet shed:

  • Reclaimed Materials: Use salvaged materials beyond pallets, like old window frames or doors, to add character and uniqueness.
  • Vertical Gardens: Create vertical gardens using pallets or repurposed containers to add a touch of greenery.
  • Lighting: Strategically placed lighting can transform the atmosphere of your shed. Consider solar-powered lights for an eco-friendly option.
  • Paint & Stain: Don't be afraid to experiment with colors and stains to create your desired look. Consider using eco-friendly paints.
  • Landscaping: Surround your shed with attractive landscaping to blend it seamlessly into your yard.

Building Your Pallet Shed: Key Considerations

Building a shed from pallets isn't as simple as stacking them up. You'll need to plan carefully, paying attention to the following:

  • Foundation: A solid foundation is crucial. Consider using concrete, gravel, or even treated lumber.
  • Framing: You'll likely need to add a wooden frame for structural support and stability. This will help ensure your shed lasts.
  • Roofing: Choose a roofing material that suits your climate and budget. Consider metal roofing for durability and longevity.
  • Insulation (Optional): For year-round use, consider adding insulation to make your shed more comfortable.
  • Doors & Windows: Source appropriately sized doors and windows to match your design.
  • Permits: Check your local building codes and regulations before starting construction. You may need permits depending on your location and shed size.

Commonly Asked Questions

Q: How much does it cost to build a pallet shed?

A: The cost varies greatly depending on the materials you use and the level of customization. If you source free pallets, the cost could be minimal (primarily for framing, roofing, and hardware). However, purchasing pallets and additional materials could increase the cost significantly.

Q: How long does it take to build a pallet shed?

A: This depends on your experience level and the complexity of your design. A simple shed might take a weekend for experienced builders, whereas a more complex design could take several weeks.

Q: Are pallet sheds durable?

A: With proper construction and maintenance, a pallet shed can be surprisingly durable. Using a solid frame and weather-resistant materials will significantly increase its lifespan.

Q: Can I insulate a pallet shed?

A: Absolutely! You can add insulation between the pallet walls to improve temperature regulation and make your shed more comfortable year-round.

Q: Where can I find pallets?

A: Check with local businesses, such as grocery stores, construction sites, and lumber yards. Always ensure the pallets are heat-treated (HT) or marked with an IPPC stamp before using them.

There you have it! Hopefully, this has given you a great starting point for designing your own unique and eco-friendly 10x12 pallet shed. Remember to prioritize safety and planning, and most importantly, have fun with the process! Happy building!

How to Build a Strong and Reliable Wood Pallet Shed for Your Yard’s Needs

How to Build a Strong and Reliable Wood Pallet Shed for Your Yard’s Needs

Building a Robust and Dependable Wood Pallet Shed

Tired of garden tools scattered across your yard? Yearning for a neat, organized space to store your outdoor equipment? Building your own wood pallet shed offers a cost-effective and surprisingly sturdy solution. This guide provides a comprehensive walkthrough, empowering you to construct a reliable structure perfect for your needs. We'll explore material selection, construction techniques, and essential finishing touches, transforming discarded pallets into a functional and attractive addition to your property. Get ready to reclaim your outdoor space!

Planning Your Pallet Shed Project

Before diving into construction, careful planning ensures a successful project. Begin by determining the shed's dimensions, considering the space available and the amount of storage you require. Sketch a basic design, noting door placement, window options (if desired), and overall aesthetic. Remember to check local building codes and obtain any necessary permits. Next, source your pallets. Inspect each pallet thoroughly for rot, damage, and loose nails before incorporating it into your design. Prioritize pallets made from sturdy hardwood for enhanced durability. Finally, create a detailed materials list, including not only pallets but also supporting lumber, screws, nails, paint or sealant, and any necessary hardware for hinges and a latch.

Assembling the Shed's Foundation

A solid foundation is paramount for stability. Choose between a concrete slab, a gravel base, or even pressure-treated lumber skids, depending on your budget and ground conditions. For a gravel base, level the ground, lay down landscape fabric to prevent weed growth, and then compact a layer of gravel. A concrete slab offers the most robust base, providing excellent stability and longevity. If using lumber skids, ensure they are treated for ground contact and properly spaced for optimal support. Once your foundation is set, you're ready to begin assembling the shed’s frame.

Constructing the Pallet Walls

Begin by carefully disassembling some of your pallets. This allows for greater flexibility in creating walls tailored to your shed’s design. Select sturdy boards free from cracks or significant damage. Assemble the walls using additional lumber to create a strong framework. You’ll likely need to use longer boards to reinforce the vertical supports, ensuring the walls maintain their shape and can withstand potential stresses. Fasten the pallet boards to the framework using strong screws, ensuring even spacing for structural integrity. Use appropriate-sized screws and pilot holes to prevent wood splitting.

Erecting the Shed's Frame and Roof

With the walls assembled, erect the main frame of the shed. Use pressure-treated lumber for the base and corner posts for superior durability. Securely attach the walls to the frame, ensuring they are plumb and level. For the roof, consider a simple gable design. Construct the roof trusses using lumber, ensuring they are appropriately sized and spaced to support the weight of the roof covering. Secure the roof trusses to the top of the frame, creating a sturdy and weather-resistant structure. Finally, cover the roof with roofing felt and a protective layer of your choice, such as corrugated metal or asphalt shingles.

Adding Finishing Touches and Protection

Once the structural framework is complete, consider adding finishing touches to enhance both the aesthetics and functionality of your pallet shed. Install a sturdy door using appropriate hinges and a latch. A simple window can also enhance ventilation and brightness. Consider adding shelves for organized storage. Protect your pallet shed by applying a weather-resistant sealant or paint. This will help prevent rot, damage from the elements, and extend the lifespan of your structure significantly. A final coat of paint can also improve the overall appearance, letting you personalize your new shed.

Safety Considerations

Safety should always be your top priority. Always wear appropriate safety gear, including safety glasses, gloves, and sturdy work boots. Carefully handle tools and materials to prevent injuries. When working with power tools, follow the manufacturer’s instructions meticulously. Ensure the work area is well-lit and free of clutter. If unsure about any aspect of the construction, consult a qualified builder or contractor. Your safety is paramount throughout the entire process.

Building a wood pallet shed is a rewarding project that combines resourcefulness with practical construction. By following these steps, you can create a durable and attractive storage solution that perfectly complements your yard’s needs. Enjoy your new, organized outdoor space!